
Did you have to make a lot of adjustment on your chain length or a little bit of adjustment. Did changing the size of the side rings change things? Did you have to adjust the chain length to compensate? All of these observations that you make not only with your own tatting but also with that of other pieces of tatting you see, will help as you begin to create your own designs. Sometimes a design doesn’t need a big change, just a little tweak and the things that you learn doing mundane little edgings give you the tools you need when you are working on bigger projects.
One of the things you learn early on is that in something like this design course there is no wrong answer. How could there be? You are the designer, that’s what you’re trying to make so whatever it is, it’s RIGHT. It may look like garbage, but it’s your garbage. If it works for you, it’s RIGHT.
Even if you have never tried to design anything before you actually know more about designing than you think you do. Part of what you learn by doing these simple edgings, is fixing in your own mind what you actually do know. For instance, you have been able to tat several samples from nothing more than a rough diagram. You weren’t given a stitch count, you just worked out something that looked good to you. Each person has their own opinion about what looks good and what doesn’t.
Look at your samples and then look at some of the simple edgings in a pattern book or online. Notice how with even a simple ring and chain edging, that everyone adds their own little twist to it? Then move on to clovers and again you can see how each person puts their own stamp on it and there are as many variations as there are tatters. All different variations, and they all work. Every designer is going to add their unique perspective to what they make. Still, 2 different tatters might work totally independent of one another and yet develop something very similar.
Can you think of some things that you can do to add variety to your tatted edging? We did some tatting with an assortment of different picots and picot lengths. You can also do double picots or add Josephine knots, or make zigzag chains for texture or cluny leaves for solidity. Every additional technique you know allows you to add another dimension to your tatting.
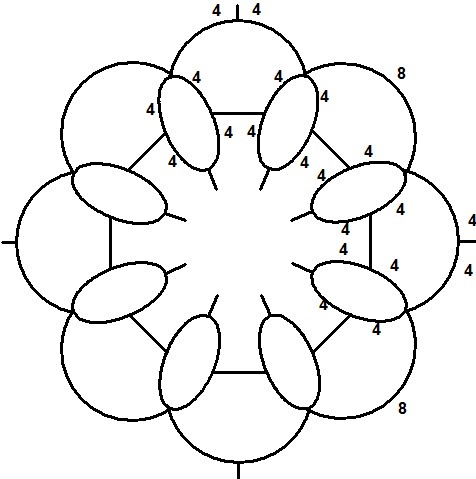
That brings us to our next subject and this is where you really get to play around. This is a little ring and chain doily that I designed. The centre of it is packed with tatting and I could have just continued making the same thing row after row, but we have already seen that too much same-ness is boring. Unlike the ring and chain doilies we looked at earlier, there IS variety here. There are upright rings and rings laying on their side, there are rings on top of chains, there are little rings and big rings, but the picots are just on the chains around the little rings. Still, too much of anything is boring.

When I got to this point of the design I couldn’t think of anything to keep it from being just a mash of stuff crammed into a small space. I knew I needed to let the light in, so instead of going around, I went out. Suddenly, it’s not boring any more. It’s the same repeated theme throughout, but by reaching outward instead of around, it suddenly gains character.

See what happened in between? Lots of negative space. The negative space let’s the eye rest from all the busy-ness of the centre so that it can take in the shape of the design. You don’t even really see the crammed mass of tatting in the centre because your eye is drawn outward to the points. If you go back and browse through doily patterns, the ones that are most appealing often have significant areas of negative space. Negative space gives you breathing room, a rest for the eyes. It separates one area of a design from another and gives the brain a chance to focus on parts of a pattern separately as well as creating design within design.
Note: Repeated themes or repeated motifs are a good idea in a larger project as it brings continuity into the design.
When you begin designing the temptation is to attach your next bit to every available picot. In this next exercise we are going to deliberately create negative space. In creating your negative space, don’t forget to include structure. Bare chain can define an area, creating negative space, but too long a chain without some defining shape will result in a floppy motif. I call them “spaghetti chains” because like spaghetti, they have no more support than a wet noodle. Rings hold their shape and give structure, so a more successful design can be achieved by using a mix of rings and chains or by using split rings or cluny leaves rather than just bare chains. If you can hold your finished motif by one outside element and it holds up, you probably have a good design, if it flops over, you probably have spaghetti chains. That's OK if you plan to add another row to hold it together, but if that's where you plan to stop, you may want to change your design.
We will be working with a very simple ring and chain motif, so we are still working with just rings and chains. Putting negative space into a design is both easy and difficult. It’s easy because it’s empty space. It’s space where there isn’t any tatting. It’s difficult because it means taking a flying leap in your tatting in the hopes that what you do will look good later on. We’re not going to take a flying leap, we’re just going to puddle jump.
You’ll notice in this design that one chain has a picot but the next chain is bare. Your homework is to tat this base motif and then add another row of tatting joining only to the alternate chains. That means that you are going to tat the second row of tatting, OUT, before you go around.
There are two ways of working this as shown in these two samples. First, you can tat the ring and chain ending the first row at the base of the starting ring like the first sample. Second, you can tat the first row ending with a split chain like the second sample. However you end the first row will position your tatting for the next row and help to decide where you go from that point onward.

So where will you go?
As always feel free to add your questions or comments and I will address them.
